
Photographing in Manual Made Simple | Sarah Kane Photography
/If you are new to this blog series you may find it helpful to start from the beginning. All current posts can be found at the end of this post in chronological order. If you’ve already been following along then welcome back!
Cameras Don't Take Great Photos. People Do.
Today’s blog post is going to change your life! I’m about to share with you a few easy tricks that will drastically improve your photography skills! Before we get started let me tell you a little bit about how my brain works, so you have a better understanding of my teaching methods.
I am self-taught in the area of photography. Yes, I took film photography in high-school many years ago, but I really had no idea what I was doing. Once point and shoot digital cameras were introduced I gave up learning and surrendered control to my tiny little automatic camera. When I purchased my first DSLR back in 2008 I was fooled into thinking a fancy expensive camera meant great images. I cringe now when I hear someone say “wow, your camera takes great pictures”. A camera is only as good as the person operating it.
Let's Keep Things Simple
Learning to shoot in manual mode was very frustrating for me. So many people tried to help and explain what the different settings meant and how they worked, but it was all so technical which went right over my head. It just never made any sense (my brain couldn’t be any more towards the right)! It would take a few years for me to really “get it” and once I did it seemed so simple! If you’re like me then hopefully this blog series saves you a lot of grief and frustration.
As mentioned in my previous post, Three Ways to Improve Your Photography Skills, what I am going to teach you pertains to my own personal style of photography and is not the only way to do things. It’s also not the only way I do things. This is a very basic approach to get you started and hopefully things will begin to make sense. Once you have a basic understanding you can begin to branch out and begin developing your own personal style.
Natural Light : One Subject
The following approach to learning manual only pertains to natural light settings (no flash) and photographing of 1 single subject or object. When using a flash or a strobe your settings will be much different (photographing with flash is a series all of its own).
The 3 Settings That Control Exposure
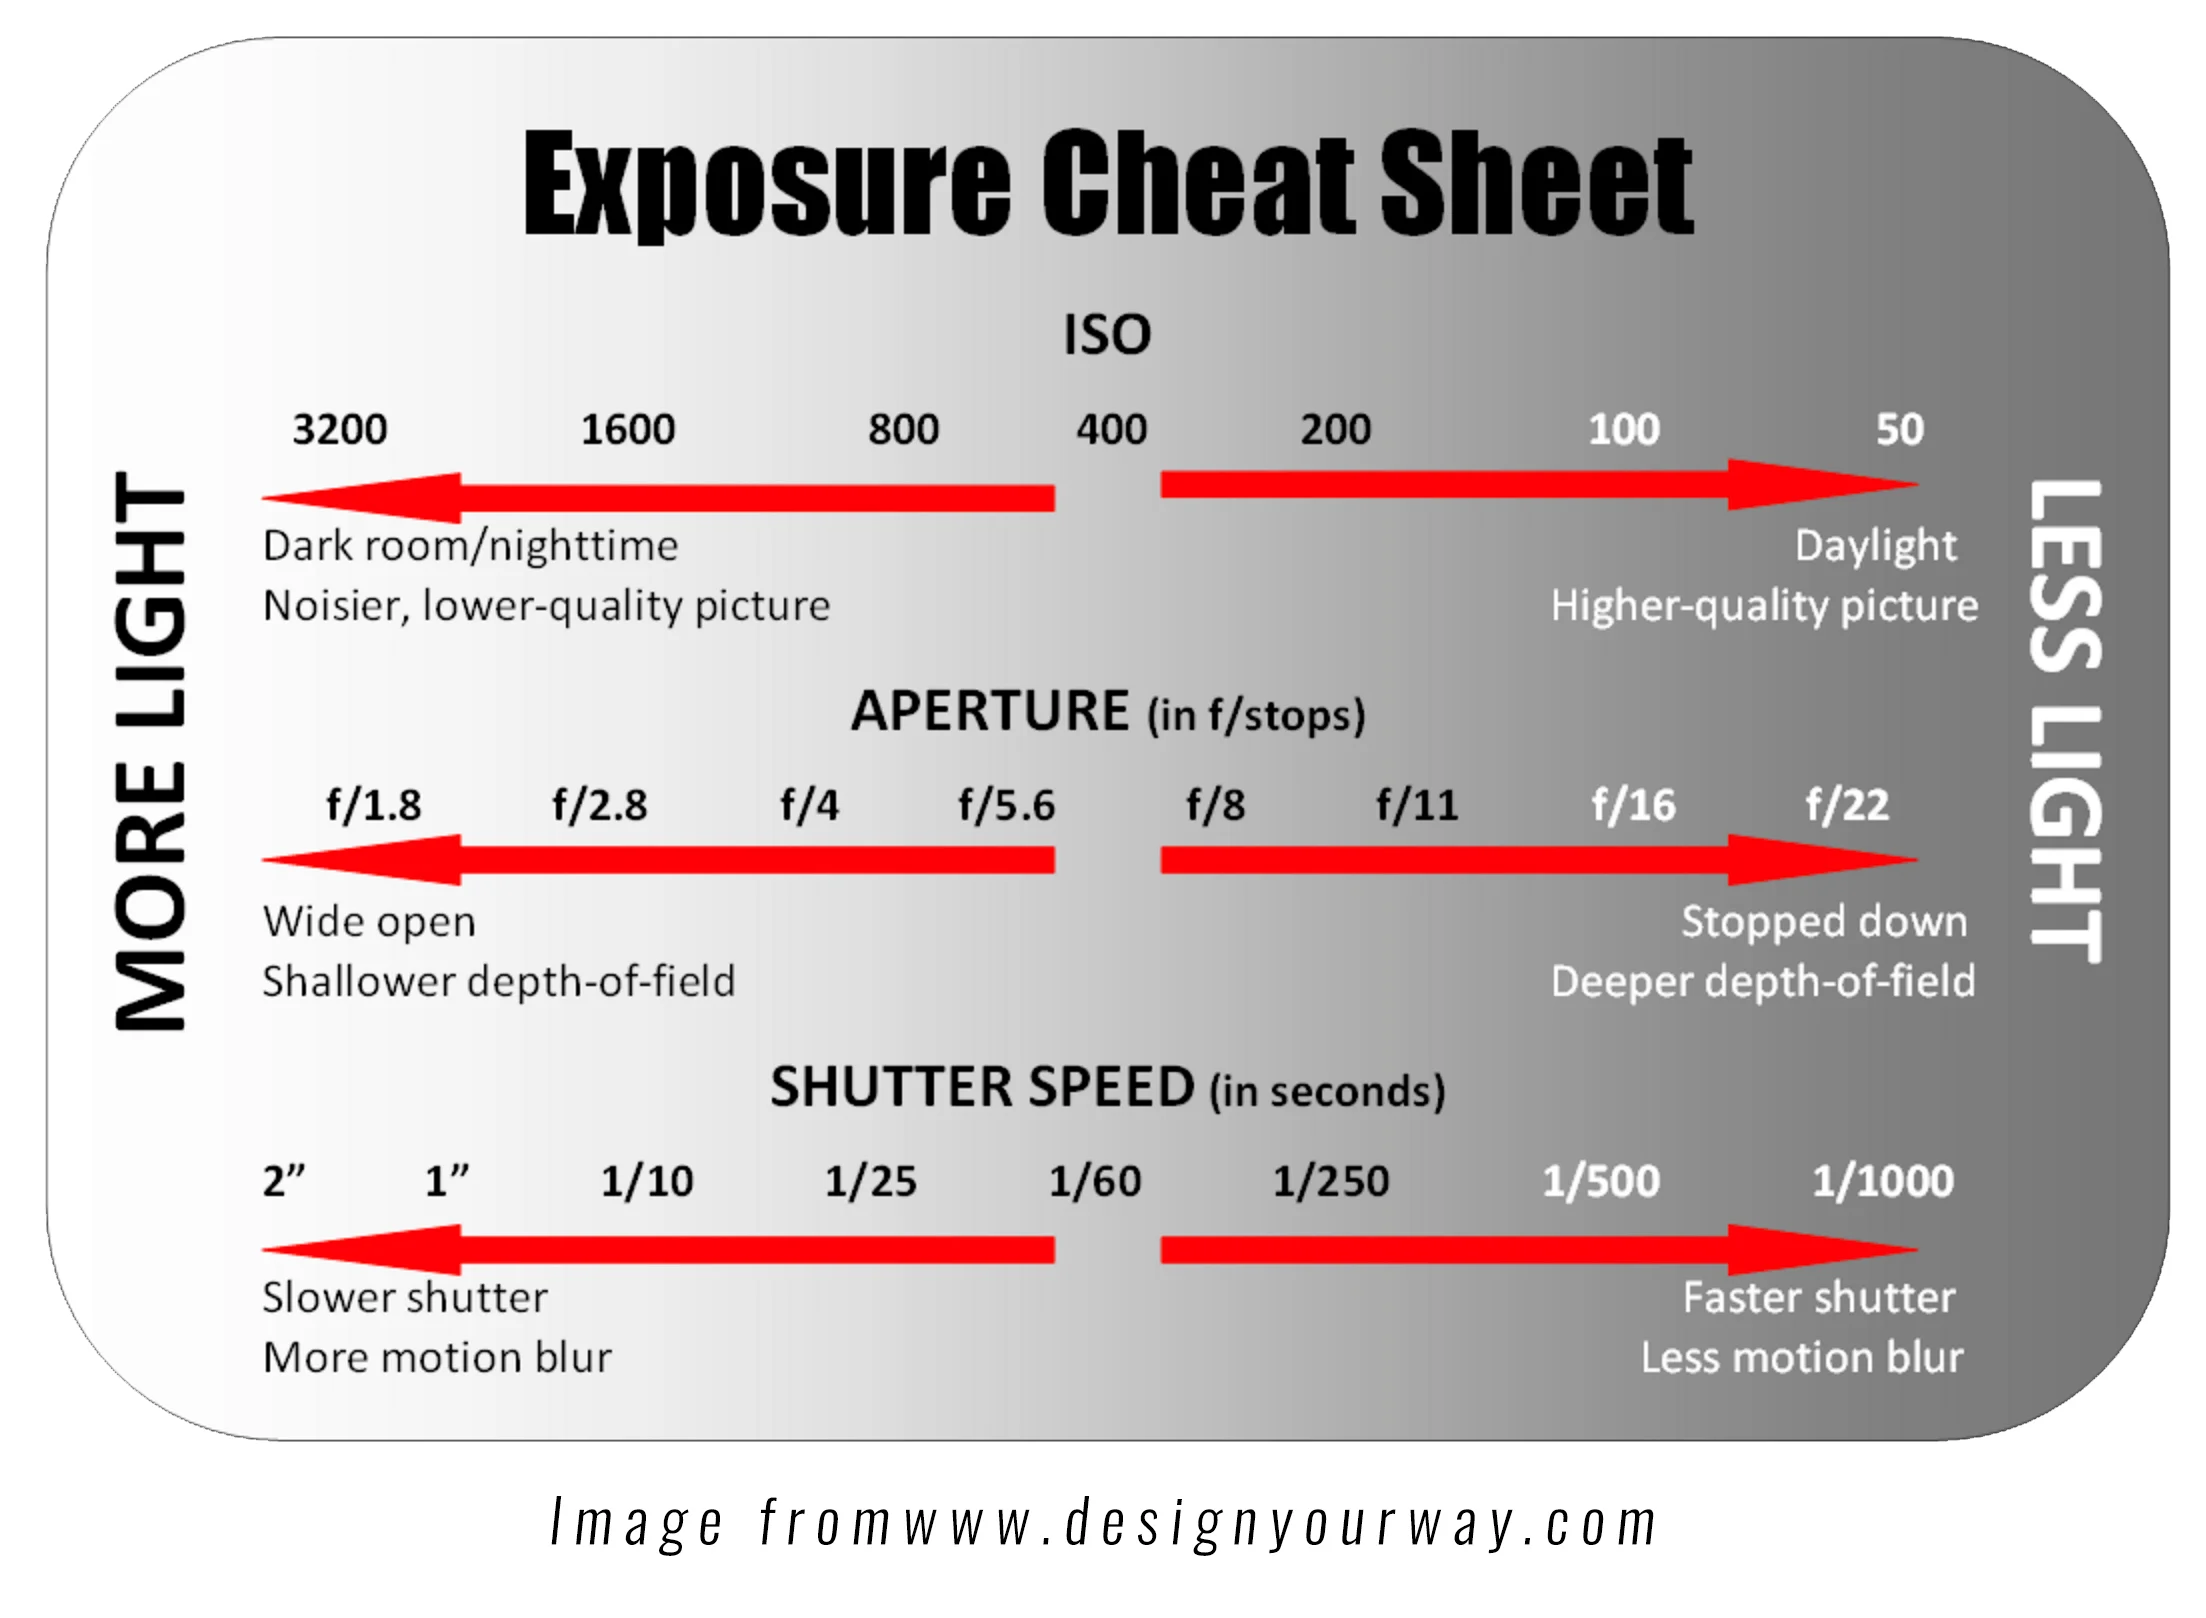
EXPOSURE refers to how bright or dark your image is. There are 3 settings that determine the exposure of an image. They are Aperture, Shutter Speed and ISO.
Aperture and Shutter Speed affect the amount of light let into your lens and ISO is related to the sensitivity of light let into your camera. That's about as technical as I'm going to get here, so let's break it down in the simplest way possible. After we've broken it down and explained in layman's terms I will give you settings to try!
1. Aperture (f/stop) - Affects the amount of background blur (known as bokeh) in your image. This is also known as depth of field. The lower the f number (f/1) the more background blur. The higher the f number (f / 7) the less background blur. So if you want a lot of your background in focus you will want to use a higher Fstop such as f/5 or higher. If you want a really creamy blurry background with the focus being on your subject then you will want to use a lower Fstop such as F / 4 -F / 1.4.
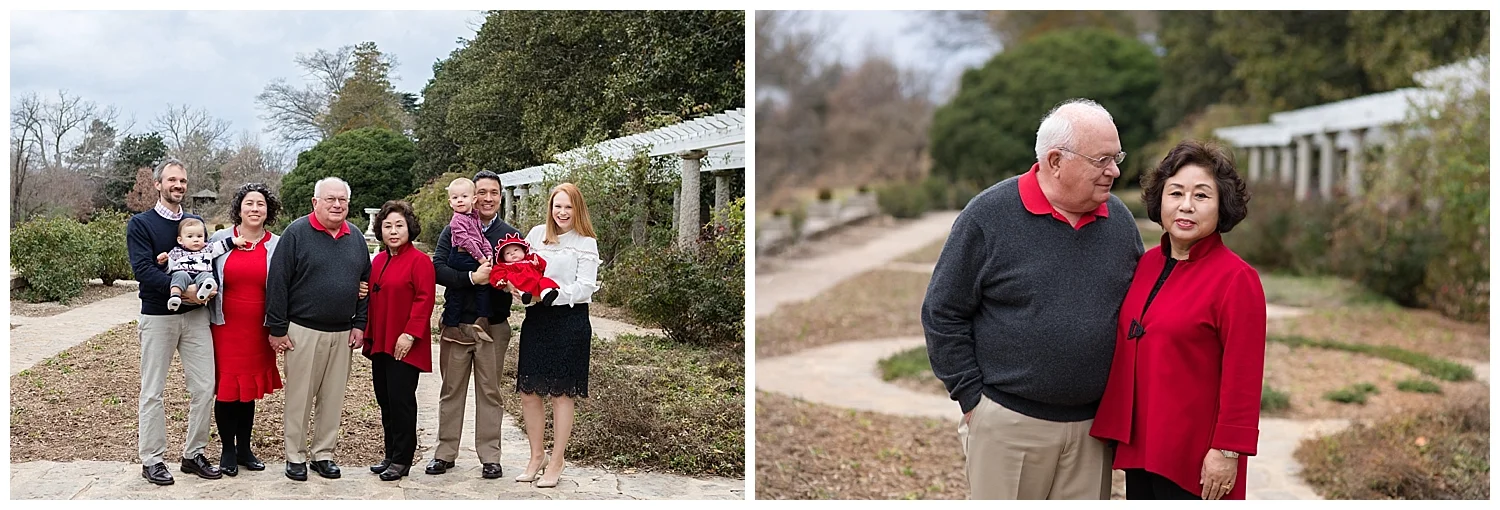
The image on the left was shot at f / 4.0 and the image on the right was shot at f / 2.8. Can you see the difference in the background?
2. Shutter Speed - Affects motion blur. The lower the shutter speed 1/10 (of a second) the more motion blur will occur. For example if you have small children running around and you don't want them to be blurry you will need a faster shutter speed of 1/200 (of a second) or higher. The faster the shutter speed the less likely your subject will be blurry.
3. ISO - Affects the amount of noise or grain in an image. The lower the ISO the less noise. The higher the ISO the more noise.
Settings Made Simple
The camera setting below works best when photographing a single subject (a child, a pet, a still object) in a natural light setting (no flash). I want to share with you a setting that I use quite often and is a great place for you to start. Grab your camera, put it in manual mode and set each to the following settings below (every camera is different, so if you don't know how to do this you will need to get your user manual out. If you've lost it I'm sure you can find the manual on the internet).
Shutter Speed - 1/200
Aperture - (set your aperture as low as it will go, but no lower than f/2 and no higher than f/4)
ISO - 100
Leaving your shutter speed at 1/200 will ensure there is no blurring of your subjects. I almost always leave my shutter at this speed when shooting in natural light.
I like my images to have a lot of bokeh (background blur) and almost always shoot wide open (meaning at a low aperture or f/stop). For photographing 1 subject I almost never shoot above a f/2.8.
Once you have the shutter speed and aperture set you likely will not need to adjust them. With practice you will start to understand all 3 settings and how they work, then you can begin to play around with adjusting shutter, aperture and ISO to create your own unique style.
The only setting you now have to worry about adjusting is your ISO. Pretty simple!
Understanding ISO
You learned above that ISO affects the amount of noise or grain in an image. Remember ISO also has to do with how sensitive your camera is to the light. Every camera has a sensor which gathers surrounding light and transforms it into an image. Back in the day of film ISO was the film speed. If you need more light simply increase your ISO, but for now leave the aperture and shutter speed alone.
Getting the Correct Exposure
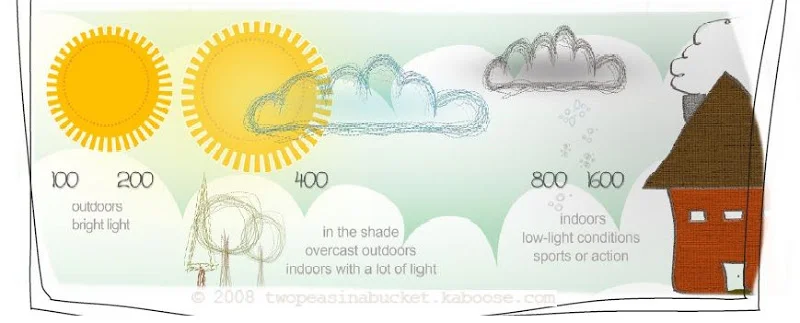
Find an object to focus on and take a picture. Look at the back of your camera. What is the exposure like with your ISO set to 100? If the image is too dark then simply increase your ISO to 200. Keep increasing until your image is properly exposed. The chart below is a great guide for how to set your ISO in different lighting situations. I know when I am in full sun my ISO is going to be no higher than 100. I also know if I am in the shade I am likely going to begin with my ISO a little higher. One thing to be careful of is if your ISO gets too high your images will begin to look grainy and noisy and you don't want that! Certain cameras can handle increasing your ISO beyond 800 without getting too much noise. If you are just starting out though and have a beginner's camera I would keep your ISO under 800.
What If my image is too bright?
If your ISO is as low as it can go at 100 and your image is still overexposed (too bright) you will need to increase either your shutter speed or your aperture. By increasing your aperture you will lose some of the bokeh (background blur). Because I like an image with strong bokeh, in this situation, I would increase my shutter speed. Keep increasing until you achieved the correct exposure.
Looking for More?
If you are looking for a bit more information on exposure, aperture, shutter and ISO PhotographyTalk's article The Exposure Triangle Explained in Plain English is a great resource!
Practice, practice, practice!
I hope this blog post has given you the confidence and tools to begin learning your camera! Remember this is only a starting point. The best thing to do is practice in many different lighting situations!
questions?
I'd like to invite you to join my closed facebook group "Community Over Competition". Once you become an approved member (which costs nothing) you will be able to ask me and other members questions and share your work!