Wrinkle Free Newborn Backdrops! | Sarah Kane Photography

Have you had it with the tedious task of editing out wrinkles from your newborn backdrops? It can really slow down your editing workflow and can become so mundane. Well, get ready to get your life back and be done with editing out those wrinkles!!
I was determined to have wrinkle free blankets straight out of camera and I've tried a lot of different techniques, but nothing had worked until now!!
Before I share with you what I've found that works for me let me go over a few mistakes that I've made.
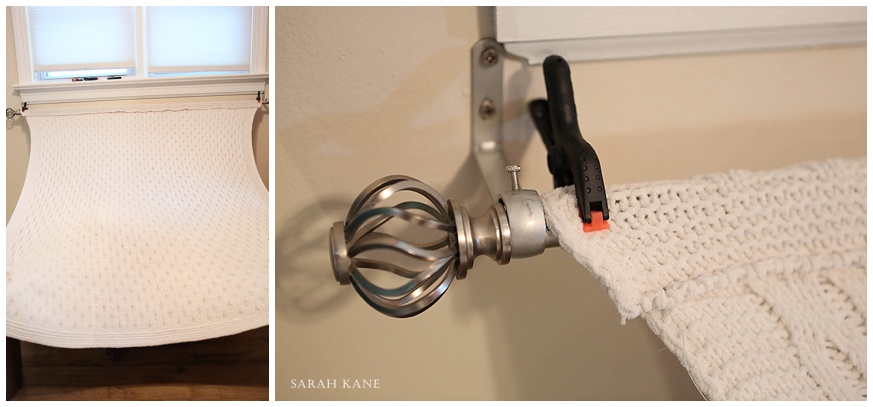
1. My backdrop bar was way too high in the beginning. I thought it had to be high enough so the wall wouldn't show, but I was wrong. If you shoot at the right angle it won't show. Your bar should be approximately 2 ft (give or take) above your bean bag.
- Once I lowered my bar I thought that would fix everything, but it didn't.
2. Next I had about 50 clips on my blanket to hold it in place, but it still didn't seem tight enough. I tried having my assistant hold it instead which helped some, but still not enough. Also, I like to have her down near baby spotting baby at all times.
3. I realized that I needed to stretch the blankets out on each side as tight as they would go, but what was I going to use? I certainly couldn't afford to hire 3 more assistants (1 holding blanket in back, and one on each side) plus it would get a little too packed in my little studio.
Since I am extremely stubborn and refuse to give up I finally came up with an easy solution that worked perfectly for me. Here's what I did. I made buckets to clip each side of my blanket to and I sewed a slip at the top of all of my blankets and backdrops so it would slip onto my pole like a curtain! It worked so much better than the clips! It also helps to have at least 2 other blankets on top of any stuffers you are using!
Materials Needed
(2) Home Depot All Purpose Buckets (they are the perfect size), spray paint (because a Home Depot bucket just isn't pretty), twine (purchased at Michael's), T-shirt (purchased at Michael's)

T shirt - $3, HD Bucket - $2.97, Spray Paint - $6.98, Twine - $6.36 A total of $20.33 with tax!
When you are spray painting your bucket I would lay it on it's side and be patient and let it dry before you turn it. If you spray it upright you will get lots of paint drips.

After your bucket is completely dry turn the t-shirt inside out and put the head opening at the bottom of the bucket. Fold the t shirt over the edge of the bucket. Take your twine and wrap it all around to hold the t-shirt in place. I also wrapped twine around the bucket handle. Make sure you put some weights in the buckets so it doesn't tip over and will stay in place. That's it!

Now just put a bucket on each side of your setup and clip the blanket to the buckets.
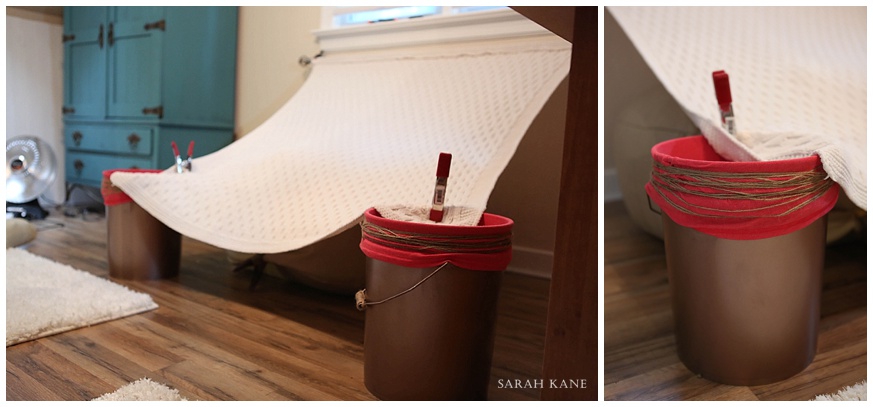
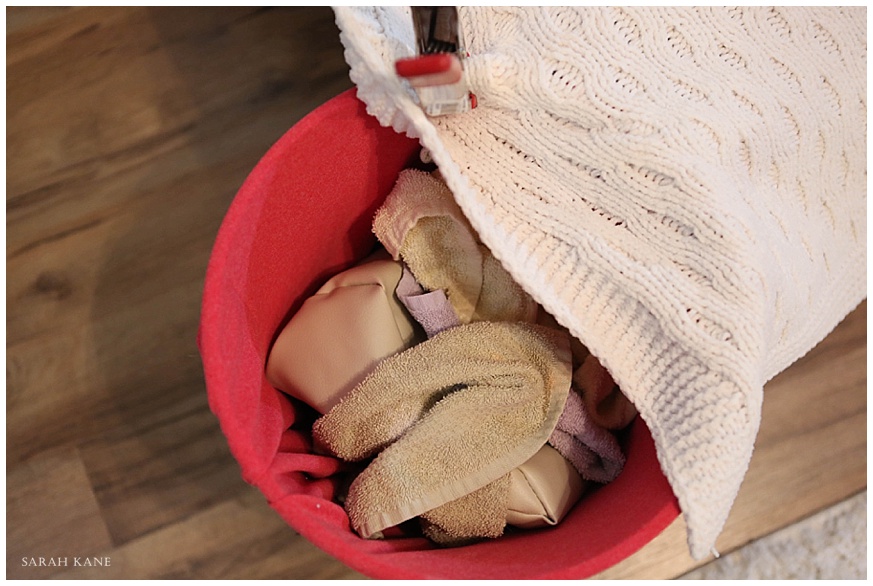
The buckets also came in handy to hold my stuffers!
I hope this post helps you cut down your editing time and get your life back!! Please leave a comment or contact me if there are other topics you'd like to see blogged!

Final Image